A multibootable USB pendrive is handy so that one can carry various operating systems or tools on one drive. Ventoy is an open-source tool that does all of this work quite easily. In this article, I'll go through the steps to create a multi-bootable USB pendrive using Ventoy.
Why Use Ventoy?
It has several advantages:
- Easy to use: Formatting of the USB is not required every time a new OS has to be added.
- It supports multiple ISO files: any number of ISO files can be stored and booted.
- Rapid Setup: Ventoy itself is very fast to set up, hence saving much time.
Step 1: Download Ventoy
- Go to the official website of Ventoy.
- Now, download the latest version of the Ventoy package according to your operating system- Window, Linux, or Mac.
Step 2: Installing Ventoy on Your USB Drive
Extract the Downloaded File:- After downloading, extract the compressed file to a folder on your computer.
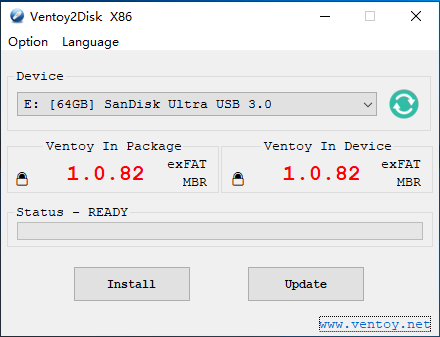
- For Windows, double-click Ventoy2Disk.exe.
- On Linux, open a terminal and navigate to the extracted folder, then run sudo ./Ventoy2Disk.sh.
Select Your USB Drive:
- Connect your USB pendrive to your computer.
- In the Ventoy interface, select the USB drive from the list.
Install Ventoy:
- Click the "Install" button. This will install Ventoy on your USB drive, making it ready for holding many bootable ISOs.
- Note: Installing Ventoy will format the USB drive, so do make a copy of any important data on the drive before pressing the install button.
Step 3: Add ISO Files to Your USB Drive
Drag and Drop ISO Files:
Basically, this means that you just drag and drop the ISO files you want onto your USB drive.
You do not need any special tool; they are copied as regular files.
You can add more than one ISO file; you are limited only by the capacity of your USB drive.
Ventoy Compatibility Check: Ventoy maintains a long list of supported ISOs, which include Windows, most Linux distributions, and many rescue tools. You can check the Ventoy Compatibility List to see if your desired ISO files are supported.
Step 4: Boot from Your USB Drive
Restart Your Computer:
- After adding ISO files, restart your computer and boot from the USB drive.
- To do so, when your computer starts up, press the F12, F10, or ESC key to bring up the boot menu.
- Now, select the USB drive as the boot device.
Choose Your ISO:
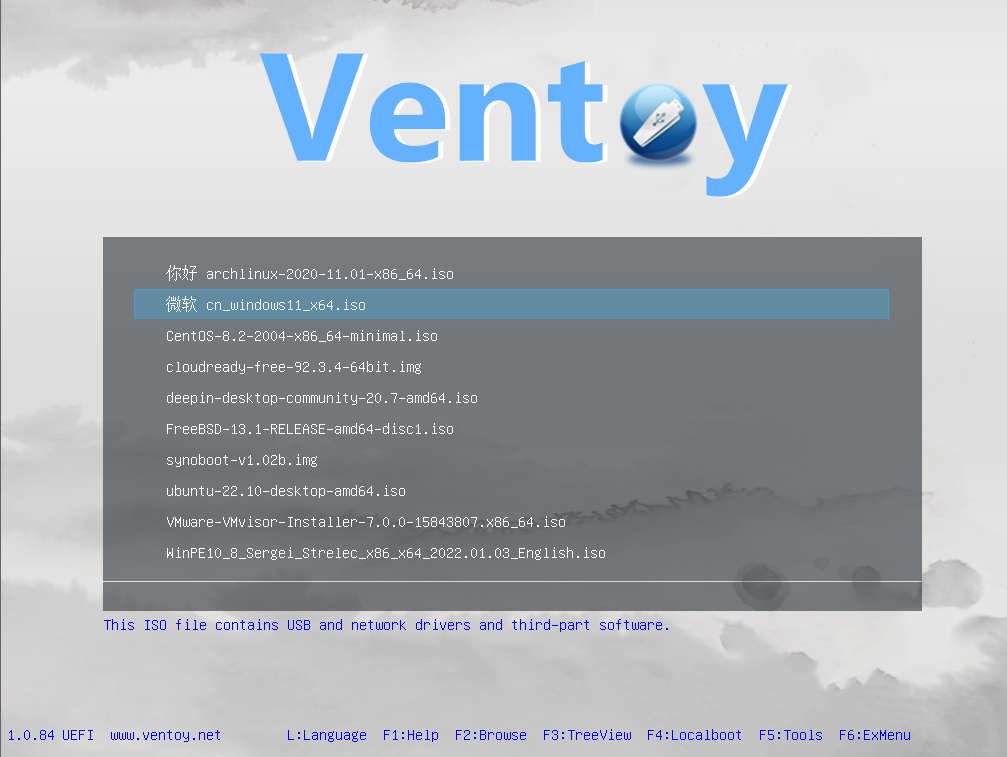
- Ventoy will show a list of all the different ISO files on your USB drive.
- As guided, highlight using the arrow keys the ISO file you want to boot into then press Enter.
Step 5: Enjoy Multi-Boot Functionality
You can now enjoy having multiple bootable systems in one USB drive. Ventoy makes it so easy to change or switch between many operating systems or tools while only using one USB drive.
Troubleshooting Tips
ISO Does Not Boot: Ensure the ISO file is supported by Ventoy and is downloaded properly.
Boot Menu Does Not Show USB: Check settings in BIOS/UEFI to ensure USB booting is enabled.
Conclusion
Ventoy offers an easy way to create a multiboot USB pendrive. With just a few steps, you will be able to carry as many operating systems and tools on a single USB drive, making it one of the essential utility tools for any IT professional, developer, or tech-savvy user. Just follow this guide to have your multi-bootable USB drive up and running for more flexibility and efficiency while computing.


